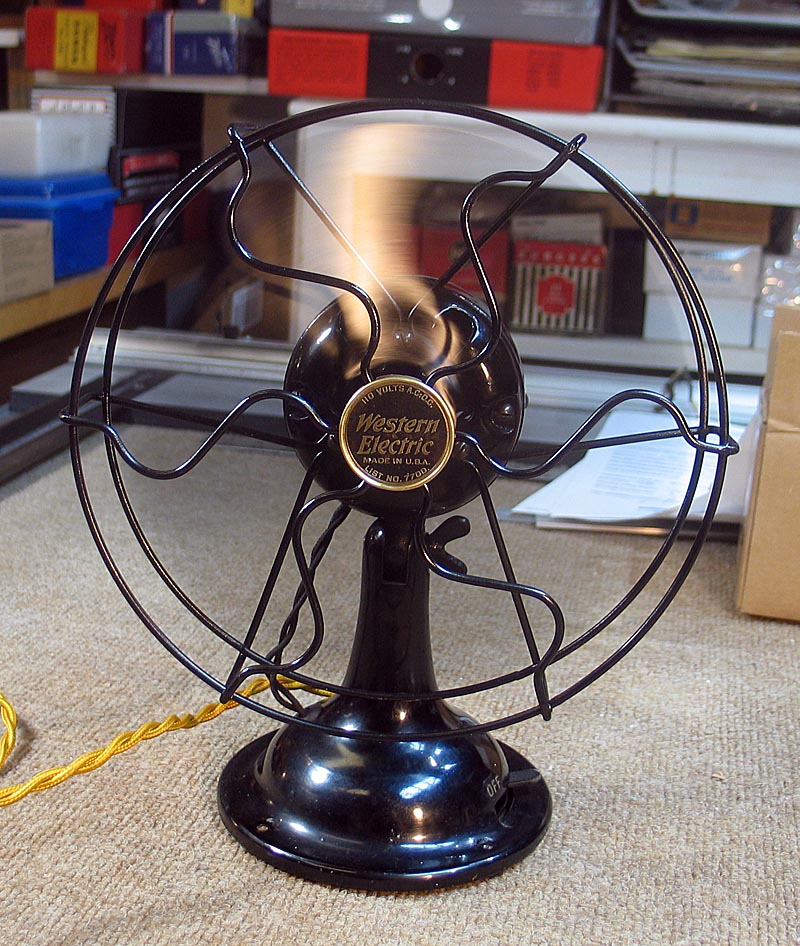
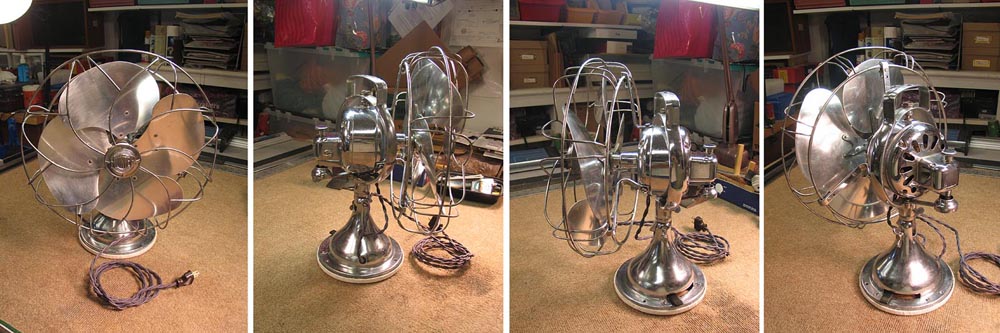
I found this very nice Western Electric fan in an antique shop in Dahlonega, Georgia, several years ago. The power cord had been cut off, an indication that the fan probably didn't work. It sat on a shelf until July, 2020. During the Covid-19 pandemic, I clearned up a several projects that had been lingering for a few years. So, I started restoring this fan by disassembling the motor to service it and check it out.
The headwire and internal wiring to the field coil and the armature brushes looked to be in very good condition. The brushes were in good condition. So I chucked the armature in a lathe and cleaned the oxidation off the laminations and commutator with fine sandpaper, much as I did with the Hunter fan described further down on this page. When I reassembled the motor, I forgot to remove the brushes and ending up crushing them. The first delay then was waiting for a new set of brushes from Eurtron Electric.
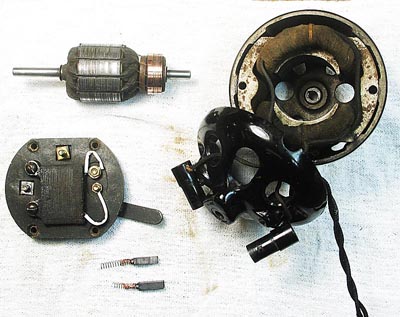 The new brushes arrived shortly, and after installing them, I hooked up the motor assembly to a variac and isolation transformer to test it. As I applied increasing voltage, I got sparking at the brushes, but the motor would not turn. I removed the armature and using a VOM, tested resistance of the commutator bars. Tests indicated a bad armature. I sent the armature to White Armature for rewinding. So I had a further delay of about two weeks while I waited for the armature repair.
During this time, I did a thorough cleaning of the other fan parts. The original paint on the fan was in very good condition, so I decided to leave the original paint alone. The cage and fan blades were in poor condition, so I repainted both.
I cleaned, tested, and serviced the fan control. The three position switch is marked OFF/AC/DC. The AC position feeds mains current directly to the fan motor. In DC mode, current is shunted through a wire-wound resistor. I also installed a new cloth-covered AC power cord.
When the armature was returned from White Armature, I reassembled the motor, installed the new brushes, and tested the motor. It worked perfectly. Greatly relieved, I put everthing back together and and was impressed with how quiet and powerful the fan worked.
Western Electric did not actually manufacture their own fans. It beleive that this model may have been made for Western Electric by Myers-Robbins, a large fan manufacturer who sold fans under different house brands, including their own.
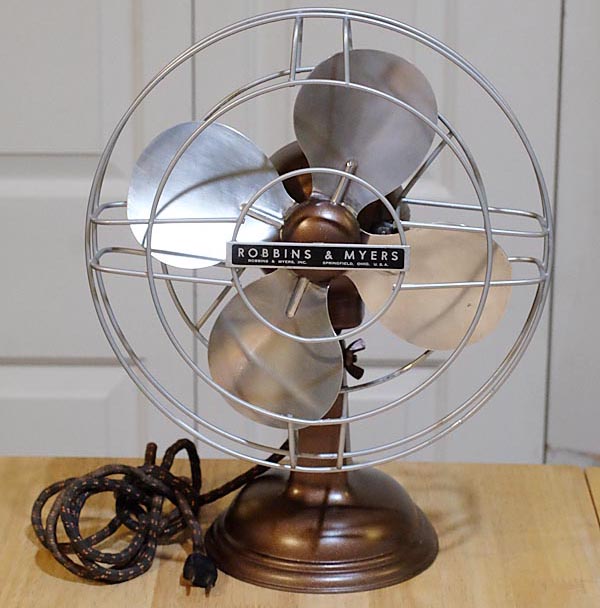
I found a pretty decent looking, working circa 1940 Robbins-Myers List 20004 fan on EBay that for some reason no one seemed interested in, so I was able to get if for just a few dollars above the opening bid of $31. When the fan arrived, it still had its original cord in good condition. The motor worked well, but the fan wouldn't oscillate. Cleaning the hardened grease out of the gearbox and re-greasing the gears solved that problem.
I couldn't find any information online on lubrication for this model. There appears to be an oil port at the front of the armature shaft accessible through one of the vents in the front cover. At the rear of the armature, under the rear cover, is another port that I assumed was for oil. So I added some SAE 20 turbine oil to the two ports.
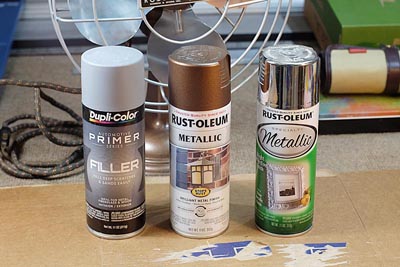 Although the fan looks good from a distance, up close there are many small flakes of paint missing, and there was some corrosion starting on several parts of the cage. I debated leaving it as found, but decided to repaint it. I took the rear motor cover to the NAPA paint store to see if they could match the color. They weren't very reassuring on the color match, so I decided to go with an off-the-shelf close color match rather than paying $20 for a possible mis-match.
I found a metallic shade of Rustoleum that was close, but a little lighter. For the cage, I used a "chrome" Rustoleum paint, but it didn't turn out the way it looked on the cap. Before painting I wet sanded the original paint, then applied a coat of primer. After the primer cured, I wet sanded it and let it dry for a day before applying the color coat.
I removed the paint from the blades, then buffed with Grade 1 steel wool, followed by buffing with Grade 0000 steel wool. Then I buffed and polished the blades with Novus 3 and Novus 2. Finally I waxed and polished the blades with Carnauba wax. Overall, I like how it turned out, except for the cage.
Radios from the 1920's were usually sold without a speaker, and were designed to be used with headphones. If the radio had sufficient power to drive a speaker, there were a number of speaker choices available, and almost any brand speaker could be used with any brand of radio capabable of driving it. RCA marketed several Radiola branded speakers, the Radiola 100, Radiola 100A, and the Radiola 100B. These were magnetic speakers. The Radiola 100B was the only speaker designed to be sold with a specific model radio, the RCA Radiola 33.
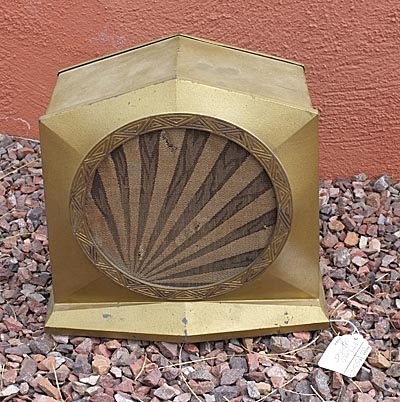
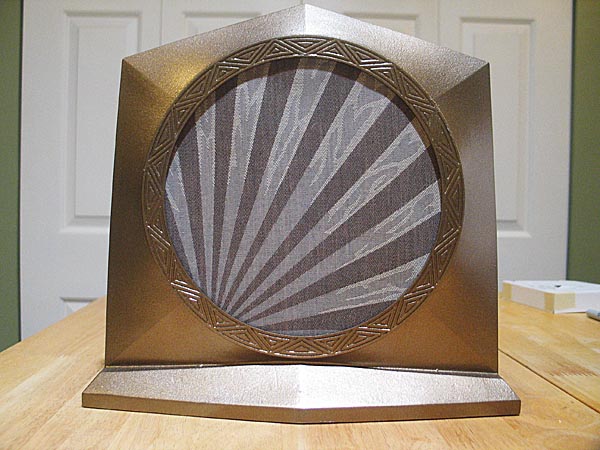
I don't know a lot about these speakers, as I haven't restored or used a 1920's era radio yet. But I acquired a Crosely 5-50 set some time back, which is awaiting restoration. When I spotted this Radiola 100B speaker at an antique fair in Arizona in 2016, I picked it up as a possible speaker to use with the Crosely. The speaker cabinet was in very good condition. Often the pot metal enclosure is cracked or distorted. This one appears to be free of defects.
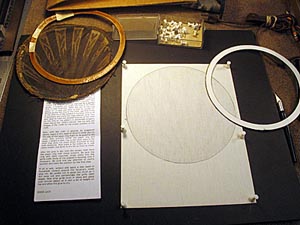
The grill cloth wasn't in very good shape. One side was ripped. I bought a reproduction from Radiolaguy. Someone had replaced the original speaker with a PM speaker, so I removed that. I eventually found an original working speaker for it on eBay.
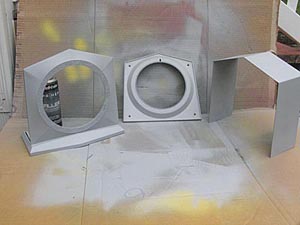
Restoration consisted of disassembling the cabinet, which is held together by four bolts. I cleaned the metal and sanded some of the rough spots, then primed the sections of the cabinet. When the primer dried, I wet sanded it with 3000 grit paper. The finish coat is Rustoleum Antique Brass Metallic paint, which is supposed to be a fairly close match to the original color. I hope that one of these days I will get around to restoring the Crosely so I can try out the speaker.

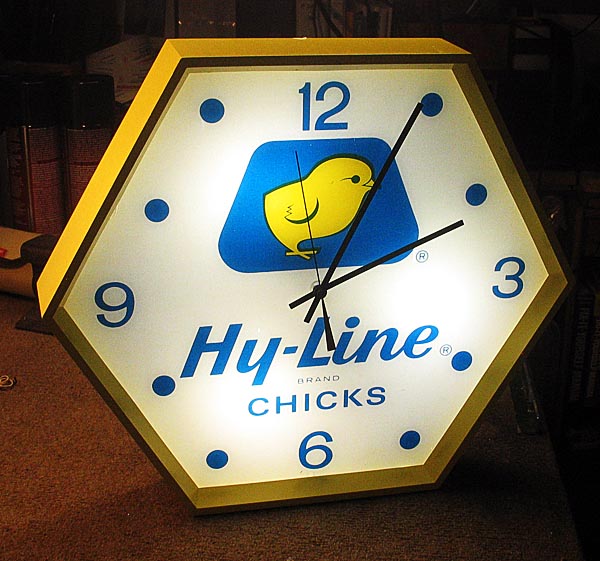
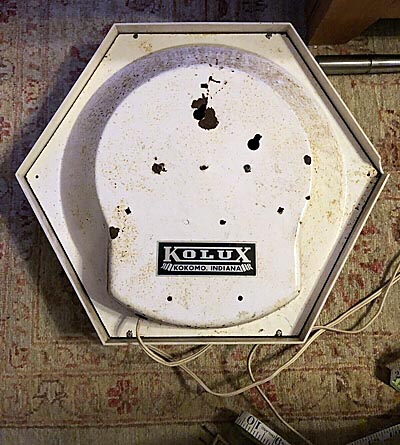
This Hy-Line Chick wall clock was an eBay purchase. When I saw it online, I purchased it specifically to restore as a gift to my sister-in-law, who raises chickens in the Shenandoah Valley. I do not know the age of this clock, and I have not been able to find very much information about either the clock or Kolux, the manufacturer of the clock, located in Kokomo, Indiana.
The clock was not in very good condition when I received it. The clock face had a couple of cracks. There was a chip broken out of the plastic bezel. The clock hands were bent out of shape, and I could not remove the nut holding the hands on the stem, so I had to cut it away with a Dremel tool. The motor did not work, and I was unable to repair it.
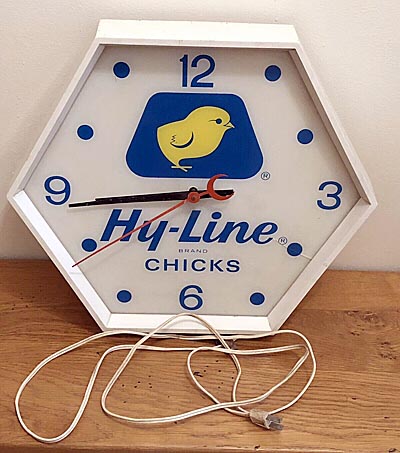 I searched online for a replacement motor, but could not find a suitable replacement. The motor sits well below the clock face, and needs a motor with a 1-1/2" shaft. I then searched for a quartz battery movement, and was able to find a motor with sufficient torque to move long hands, and a long enough shaft to pass through the clock face.
Because the motor is mounted inside the clock, replacing the AA battery every year would require disassembly of the clock. So I mounted an AA cell holder outside the clock to make changing the battery much easier. I also installed a new AC power cord. Installing three 40 watt equivalent LED bulbs completed the electrical restoration of the clock. The time can be set by moving the hands to the correct time.
 The plastic bezel as I mentioned above, had a chip broken out at one of the corners, which can be seen at the center right corner in image to the left. I glued a piece of styrene plastic inside the bezel, covering the hole, to reinforce the bezel and provide a substrate for filling in the hole left by the broken chip. I cut another piece of styrene the shape of the chip and glued it in place. I filled the gaps with J-B Weld, and also reinforced the corner with it. After the J-B Weld cured, I used spot putty to fill in remaning gaps.
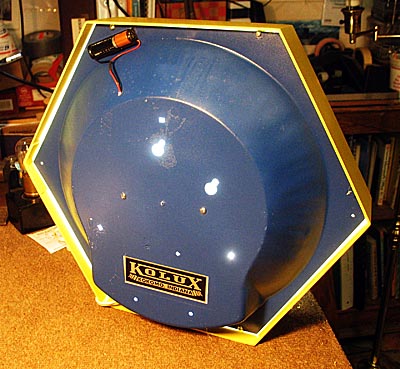 The base had quite a bit of surface rust, which I able to remove with alcohol and steel wool. Rust left behind I treated with Naval Jelly. The bezel and clock face attach to the clock base from behind with screws. Three of the four stanchions that the screws attach to were broken off, but were inside the clock. I used J-B Weld to reattach them. I then gave the base and bezel several coats of grey primer, and let it cure for a day or so. I painted the base blue and the bezel yellow, to compliment the blue and yellow found on the clock face.
Kolux appears to be a manufacturer of advertising signs. They were in business before 1929, but I don't know the date of the company's founding. Kolux has been bought and sold by several companies over years, and they may still be in business under a different name. In 1958, Kolux was acquired by Victoreen Instrument Company, and became known as Kolux Division of VIC. In 1973, Kolux was sold to General Indicator Corporation, which had apparently also bought Neon Products, Inc, another advertising sign manufacturer. Kolux and Neon Products appear to have been merged together as Kolux NPI Division of General Indicator Corporation. General Indicator Corporation had itself been acquired in 1968 by CompuDyne Corporaton.
Clocks made after the 1973 merger with CIG have a sticker on the back showing Kolux NPI Division GIC, in Lima, Ohio. The example here may be a pre-merger clock as it has a plain Kolux Kokomo Indiana sticker. In 1988, CIG was sold to Everbrite Corporation, a major manufacturer of outdoor advertising and signage that has been around since 1927.
Hy-Line, founded in 1936 in Iowa, started as a mail-order company selling live chicks through catalogues. It is still in business, and sells chicks all over the world. Chicks are shipped domestically in the US by the United States Postal Service. Special cardboard boxes are used, and day-old baby chicks are sent to customers in every state within 72 hours. Day old chicks can survive several days without food or water.
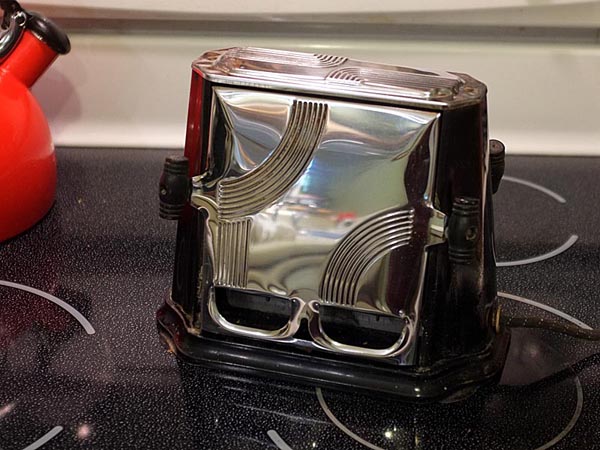
I found this nice Son-Chief Series 680 toaster in an antique shop in Donegal, Pennsylvania. Son-Chief produced these Art Deco styled toaster during the 1930's and possibly in to the 1940's. I haven't been able to find out too much about them yet.
This particular toaster is a nice example. The metal work is in good shape. The paint on the siades is a bit worn, but the wooden knobs are all present and the cloth cord is in very good condition. The previous owner usually made only one slice of toast, as one side is more blackened inside than the other.
And it works! My great-grandmother had a toaster much like this one, possibly the same model. It was always a treat to eat breakfast at her house: eggs and bacon, and toast. At home we usually got cereal for breakfast.
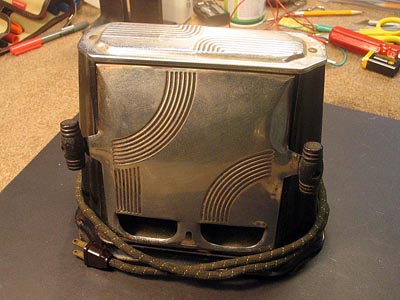
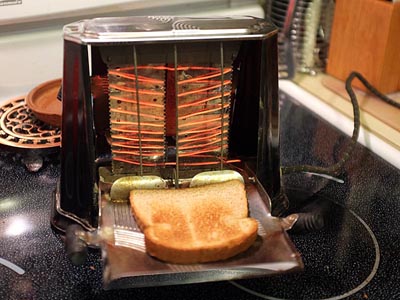
I cleaned the exterior with Bar Keeper's Friend and Novus #2, then buffed and polished the metal work. I cleaned the inside with Q-tips and alcohol. I did gently cleaning inside as I did not want to damage the parts. The whole toaster is held together with twisted metal tabs, so I could have disassembled it, and I may do that yet. I debated re-painting the black end pieces, but decided to leave as found.
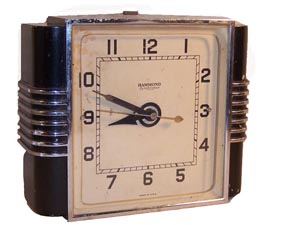
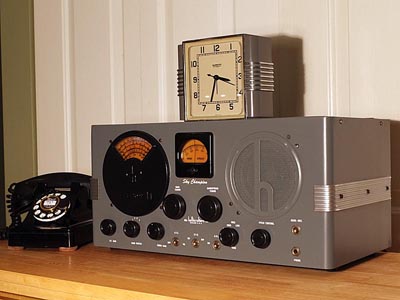
Hammond Art Deco Electric Clock
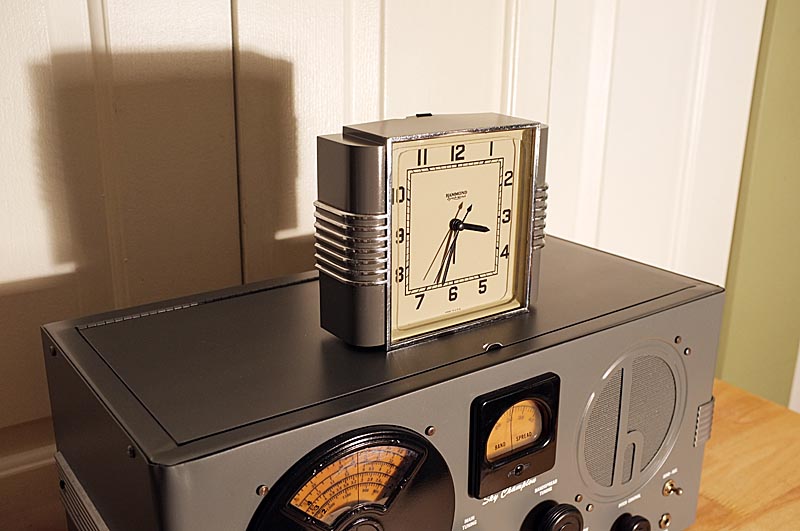 I found this Hammond electric clock on eBay with Art Deco styling very similar to the Hallicrafters S20R receiver. It was in poor condition. Someone had replaced the original Hammond movement with an Ingraham movement. I was unable to resurrect the motor in the Ingraham movement, so I put in a quartz movement until I can find an original Hammond motor for it. With an original motor, I can use the original hands, which are also much more interesting.
I also had to make a new dial face as the original had rusty stains on it. I stripped and repainted the clock to match my S20R. The clock was originally black, but with lots of chips. In black paint, it would also be a nice companion for the SX24, SX25, and SX28. I don't know the exact dates of production, but I believe this model was made from about 1929 up until WWII.
United Electric Horse Mantel Clock
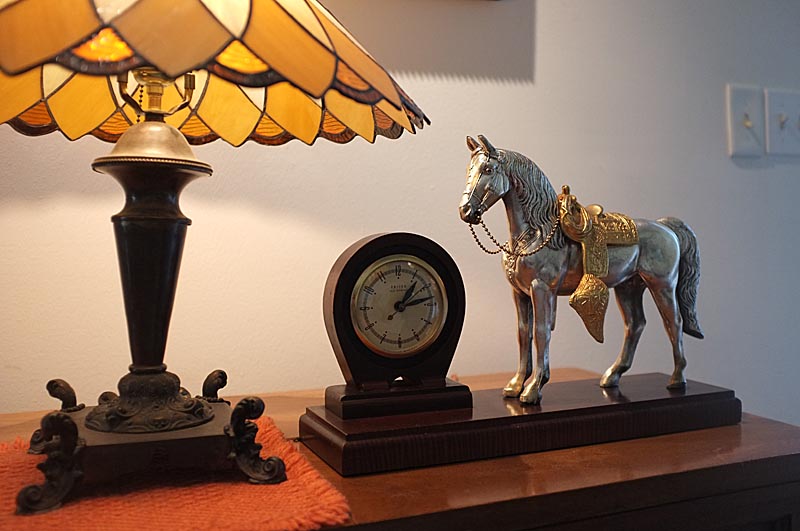 I enjoy a change of pace project now and then, and I had an interesting time resurrecting this United horse mantle clock for a friend who picked it up at an estate sale. The United Clock Company was founded in 1905. As far as is known they made only electric clocks, although it is not known when they actually started producing electric clocks. At some point they acquired the Sessions Clock company, and in the mid-fifties, changed the firm's name to Sessions. The company was sold in 1958.
The United branded clock in this piece was not in good shape, either cosmetically or electrically. The clock had some corrosion and a lot of grime in the movement. It took several cleanings with CRC contact cleaner, but I finally got it running, then applied some clock oil to the pivots in the movement. Sometime in the past the line cord was replaced, and the rear clock panel either got damaged or lost. A new cover was made from a large fruit jar lid. I added a new line cord.
Some electric clocks from the 1930's through the 1950's had a knob or switch on the back to get the movement running. This clock is marked "Self Starting" on the clock face, and it does, most of the time. Because the movement really needs to be completely disassembled and cleaned, it sometimes doesn't want to start, and it need a little nudge. I made a small, covered access door in the back, large enough to stick a finger in start the rotor spinning.
I cleaned the clock bezel and the horse with white vinegar, then applied a light coat of clear lacquer to each. I cleaned and polished the wood with Novus #1.
Like most of the old AC electric clocks, it keeps very accurate time. There's not a lot of information about the United clocks, but I think I recall reading the motors were either Westinghouse, or based on their patents. United made a variety of novelty clocks. Another well known variant is the sailing ship clock often seen in antique stores. The horse version shown here, according to one source, was often the big prize at carnival games.
Western Union Model 15B Mainline Sounder
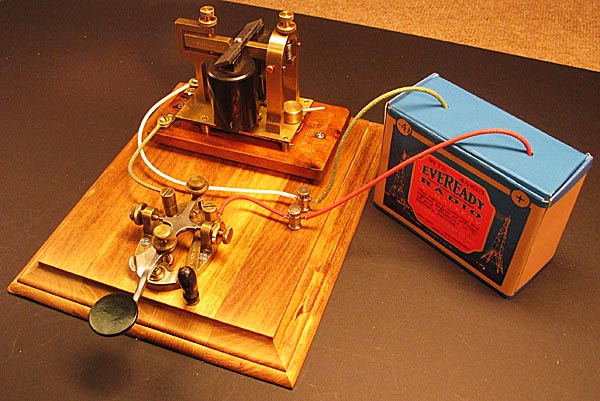
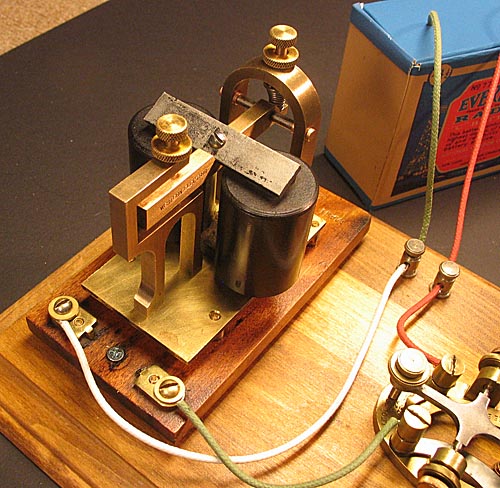
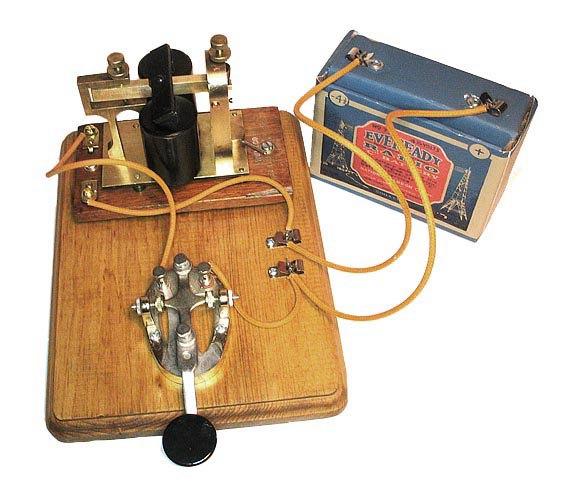 I found these Western Union Model 15B Mailine Sounders at an antique store. I didn't know anything about them at the time, but did some online research and found a good bit of information on their history, and instructions for wiring the sounder to a battery and key.
These sounders, along with several other telegraph sounders and keys, came from a railroad telegraph system in Crewe, Virginia, according the proprietor of the antique store. These two most likely date from the early 20th century, maybe the 1920's. Both were manufactured by Western Electric.
The Model 15B was a 120 ohm sounder, and I checked the resistances and found both to be good. A 120 ohm sounder requires a 4.5 volt battery, so I rigged up three D cells in series, and both worked just fine.
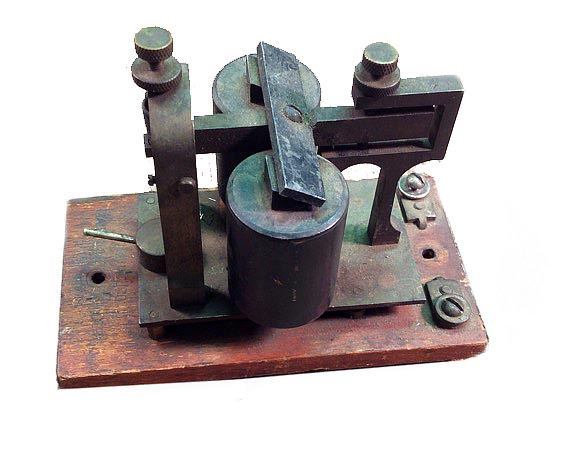 I disassembled both sounders and let the brass parts soak in white vinegar for several hours. I then cleaned the parts with 0000 steel wool and a wire brush in a Dremel tool. I then reassembled the units and mounted each on a board, along with a telegraph key.
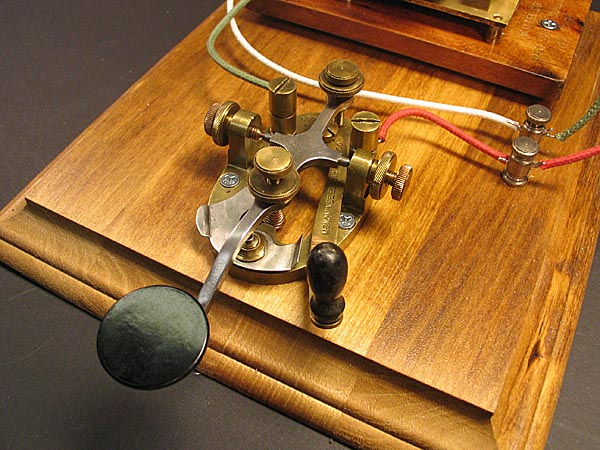
 The restored brass key shown on the unit at left, below, also came from the railroad depot in Crewe, VA.
I made vintage battery boxes to hold the three D cells, then wired the sounders, keys and batteries using reproduction vintage cloth covered wire. The two sounders could be connected together in parallel to create a two station telegraph system.
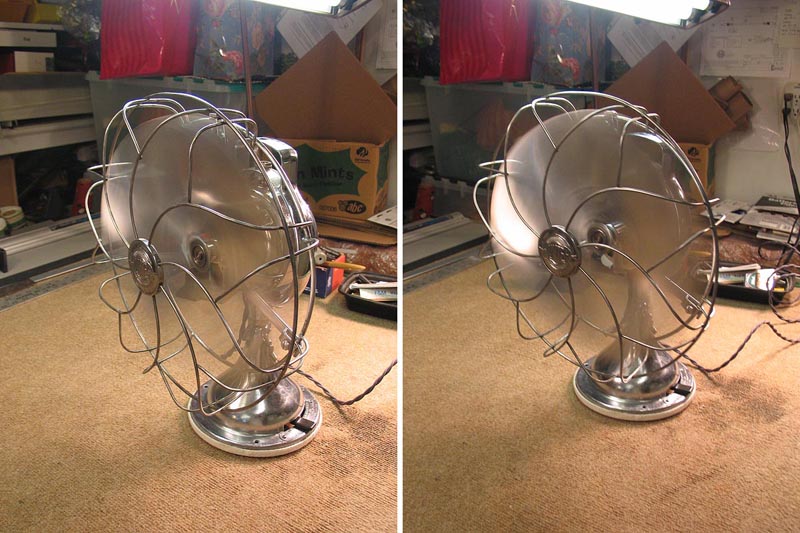
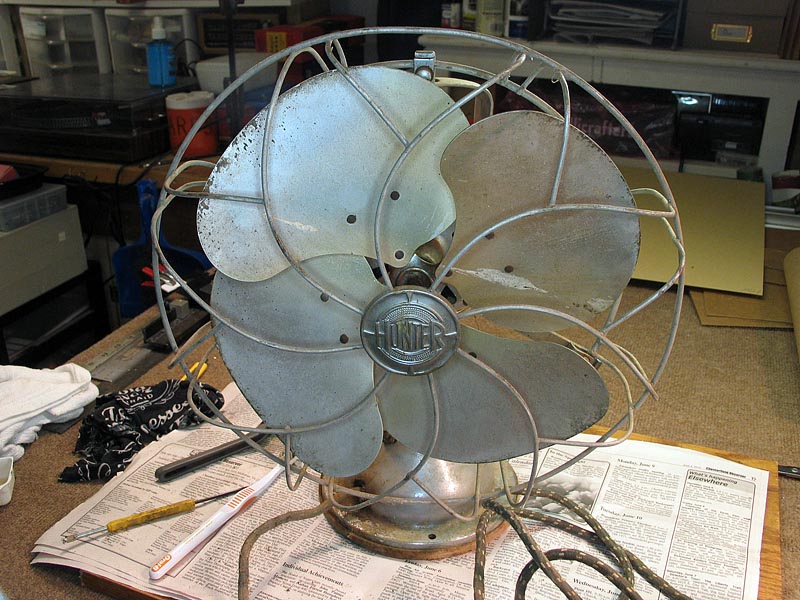 This circa 1939 Hunter Type 12 oscillating table fan was an auction buy for less than $20. It looked to be complete; however it did not work when I tried it at home. I had never worked on a fan before, but there's plenty of information online, so after some research, I disassembled the fan. The main reason it would not work was simpled hardened grease in the oscillating gear box.
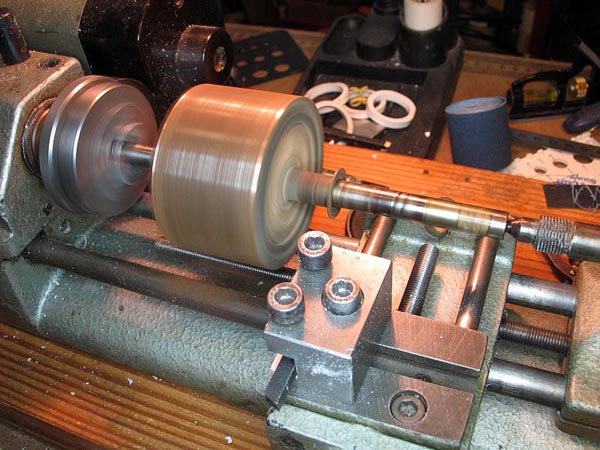
I cleaned all the hardened grease, then I chucked the rotor in a lathe and gently cleaned the rust off with emery cloth.
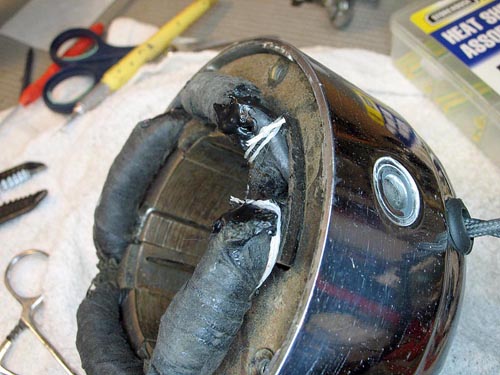
The headwire that conducts current from the switch in the base to the motor was in poor condition, with cracking insulation. So, with some trepidation, I decided to replace it. I ordered some vintage cloth covered wire, and ran a new headwire from the stator contacts in the motor down to the switch. I also installed a new AC cord with the same wire, along with a new vintage reproduction plug. I also ordered an oil wick for the front oil resevoire.
Another antique store find. Restoration of this late 1940's or early 1950's 6-volt lantern from Justrite, a manufacturer of safety equipment for industry, consisted mainly of cleaning and repainting. I couldn't repair the original on/off switch, so I replaced it with a modern switch. I will replace it with a vintage switch if I ever run across one.
The original wood handle was broken, so I made a new one from a piece of dowel I turned on the lathe, then used stain and india ink to give it a weathered look.


